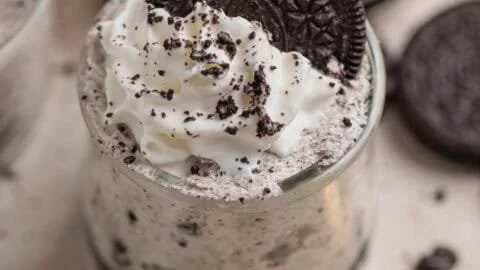
Oreo No-Bake Cheesecake Cups: The Ultimate Dessert for Every Occasion
There’s something magical about dessert that brings joy to our hearts, isn’t there? When life gets a little hectic, and you need a sweet escape, Oreo No-Bake Cheesecake Cups are here to save the day. Imagine a luscious, creamy cheesecake layered with crunchy Oreo cookie crumbs, all presented in adorable little cups. This delightful treat requires no baking, making it the perfect quick dessert for busy weeknights or special occasions. What makes these cheesecake cups stand out is their ability to impress without the fuss. Each spoonful is a heavenly blend of sweet, rich cream cheese and the familiar taste of Oreo goodness that will leave you craving more.
Why You’ll Love This Oreo No-Bake Cheesecake Cups
- Easy to Make: This recipe is beginner-friendly, requiring no fancy baking skills.
- Quick & Convenient: Prep time is just 20 minutes—perfect for when you need a last-minute dessert.
- Family-Friendly: Kids and adults alike will love the fun presentation and classic flavors.
- Customizable: Make it your own by adding your favorite toppings like fruit or chocolate.
- No Bake Required: Beat the heat—no oven means you can whip this up even in summer!
Ingredients for Oreo No-Bake Cheesecake Cups
Before diving into the fun part, gather these simple ingredients. You’ll need:
- 1 ½ cups Oreo cookie crumbs (about 15-18 cookies, crushed)
- 4 tablespoons unsalted butter, melted
- 1 cup cream cheese, softened (not low-fat for best results)
- ½ cup granulated sugar
- 1 teaspoon vanilla extract
- 1 cup heavy whipping cream
- ¼ cup additional Oreo crumbs for topping
- Optional: Fresh berries for garnish
Helpful Note: Make sure your cream cheese is at room temperature for a creamy filling—no one likes lumps in their cheesecake!
How to Make Oreo No-Bake Cheesecake Cups
Let’s get to the good part! Follow these simple steps to make your own Oreo No-Bake Cheesecake Cups:
-
Prepare the Oreo Crust: In a bowl, combine the Oreo cookie crumbs with melted butter. Mix until well combined. The texture should resemble wet sand.
-
Layer the Base: Spoon about 2 tablespoons of the mixture into the bottom of each serving cup and press down firmly. This will be your delicious crust!
-
Make the Cheesecake Filling: In a large mixing bowl, beat the softened cream cheese, granulated sugar, and vanilla extract until smooth and creamy, about 2-3 minutes.
-
Whip the Cream: In another bowl, whip the heavy cream until stiff peaks form, which usually takes about 4-5 minutes. You want it fluffy and light!
-
Combine: Gently fold one-third of the whipped cream into the cream cheese mixture. This lightens the mixture. Repeat two more times until everything is well combined—avoid deflating it!
-
Layer the Filling: Spoon the cheesecake filling over the Oreo crust in each cup. Use a spatula to spread it evenly and create a nice layer.
-
Add the Topping: Sprinkle the remaining Oreo crumbs over the filled cups for that authentic Oreo experience.
-
Chill Time: Refrigerate the cups for at least 4 hours, or overnight if you can wait! This helps the cheesecake set and enhances the flavors.
-
Serve: When you’re ready to serve, feel free to add fresh berries on top for a lovely color and extra flavor.
Pro Tips for Perfect Oreo No-Bake Cheesecake Cups
- Ensure Full Chill: The longer you chill the cups, the firmer and tastier they get.
- Room Temperature Ingredients: Always ensure your cream cheese is softened and eggs are at room temp to blend smoothly.
- Use Quality Cream: For a rich taste, opt for heavy whipping cream rather than lower-fat options.
- Add a Touch of Salt: A pinch of salt in the filling balances the sweetness beautifully.
Variations & Substitutions
Want to switch things up? Here are a few variations and substitutions for your Oreo No-Bake Cheesecake Cups:
- Flavor Swaps: Use chocolate sandwich cookies for a chocolate twist or golden Oreos for a different flavor profile.
- Dairy-Free Options: Substitute cream cheese and heavy cream with vegan alternatives to make it dairy-free.
- Add Some Fruit: Layer in some fruit like strawberries or raspberries for a fruity cheesecake twist.
- Mini Desserts: Serve them in mini cups for bite-sized desserts at your next party.
What to Serve With Oreo No-Bake Cheesecake Cups
While these Oreo No-Bake Cheesecake Cups are delectable on their own, why not elevate the experience? Here are some delightful pairings:
- Coffee or Espresso: The rich flavors of coffee complement the sweet creaminess perfectly.
- Milkshakes: For the ultimate indulgence, serve alongside chocolate or vanilla milkshakes.
- Fresh Summer Fruits: A side of seasonal fruits like strawberries or blueberries brightens the dish.
- Chocolate Sauce Drizzle: A drizzle of warm chocolate sauce adds an extra layer of decadence.
Storage & Reheating
You might be thinking ahead—how do I store these enticing cups? Here’s what you need to know:
- Fridge Storage: Keep your Oreo No-Bake Cheesecake Cups in an airtight container in the refrigerator. They stay good for 3-5 days.
- Freezer Options: For longer storage, place them in the freezer for up to 2 months. Just remember to let them thaw overnight in the fridge before serving.
- No Reheating Needed: Since they’re enjoyed cold, there’s no need to reheat. Just dig in straight from the fridge!
Nutrition Information (per serving)
- Calories: 250 kcal
- Protein: 4g
- Carbohydrates: 26g
- Fat: 15g
FAQs About Oreo No-Bake Cheesecake Cups
How long must I chill the Oreo No-Bake Cheesecake Cups?
Chill them for at least 4 hours to allow the filling to set. Overnight is even better, enhancing flavor!
Can I use different cookies for this recipe?
Absolutely! Any sandwich cookie will work well. Try different flavors for unique creations.
How do I make the filling lighter?
Folding in whipped cream lightens the filling beautifully, giving the cheesecake a fluffy texture.
Is it possible to make these Oreo No-Bake Cheesecake Cups in advance?
Yes! They’re perfect for prepping ahead of time. Make them a day prior and allow them to chill for best results.
Conclusion
In summary, Oreo No-Bake Cheesecake Cups present an easy yet indulgent dessert that everyone loves. With their no-fuss recipe, delightful layers, and rich flavors, they’re bound to become a household favorite. So, grab your ingredients, mix it up, and prepare for the sweet smiles that follow. Your family and friends will thank you for this ultimate treat! Share your creations on social media, as I would love to see how you personalize your own Oreo No-Bake Cheesecake Cups! 🍰
Oreo No-Bake Cheesecake Cups
Ingredients
Method
- In a bowl, combine the Oreo cookie crumbs with melted butter. Mix until well combined, resembling wet sand.
- Spoon about 2 tablespoons of the mixture into the bottom of each serving cup and press down firmly to form the crust.
- In a large mixing bowl, beat the softened cream cheese, granulated sugar, and vanilla extract until smooth and creamy (about 2-3 minutes).
- In another bowl, whip the heavy cream until stiff peaks form, which usually takes about 4-5 minutes.
- Gently fold one-third of the whipped cream into the cream cheese mixture, repeating until all whipped cream is combined.
- Spoon the cheesecake filling over the Oreo crust in each cup, spreading it evenly.
- Sprinkle the remaining Oreo crumbs over the filled cups.
- Refrigerate the cups for at least 4 hours, or overnight for best results.
- Serve with optional fresh berries on top.